In this learning track "How to implement consent mode with Cookiebot", I will guide you on how to quickly implement Google Consent Mode v2 using Cookiebot and Google Tag Manager. In this article I'll show you what changes are necessary in order to implement Consent Mode in GTM.
Table of contents:
Step 1: Enable consent overview in GTM Step 2: Check if consent is properly transmitted Step 3: Apply additional consent (optional) Step 4: Adjust triggers to cookie_consent_update (optional)Step 1: Enable consent overview in GTM
The first step is to enable the Consent overview feature in GTM (this is still a beta feature in January 2024 and is not enabled by default). Here’s how you do it:
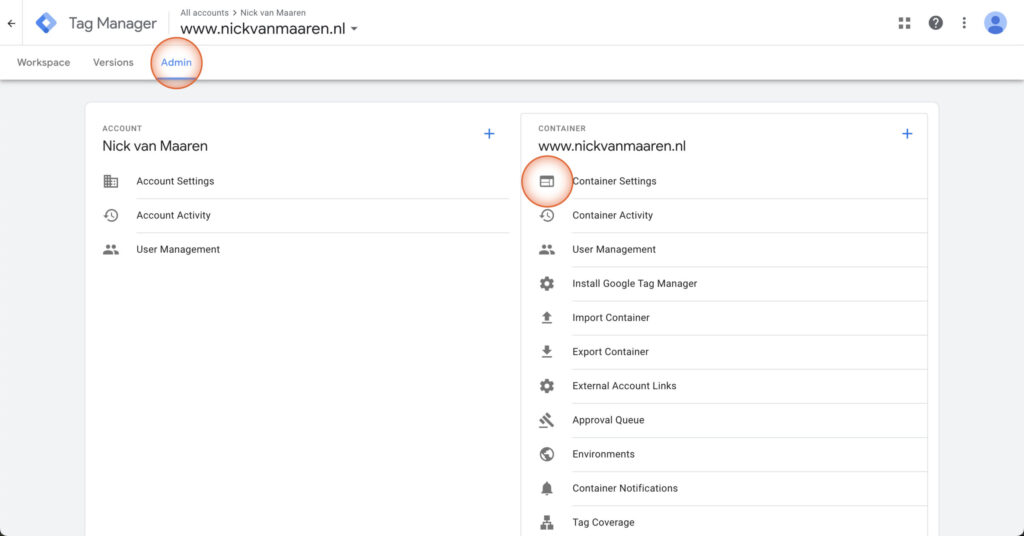
- Go to Google Tag Manager and open the container in which you want to configure Google Consent Mode.
- In the top menu, go to Admin > Container settings.
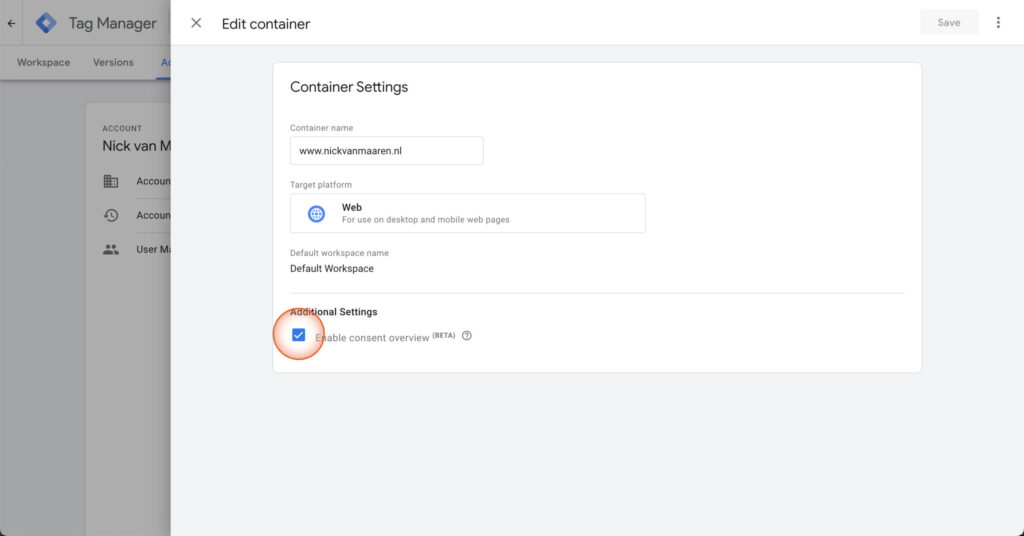
- Under Additional Settings, click Enable consent overview.
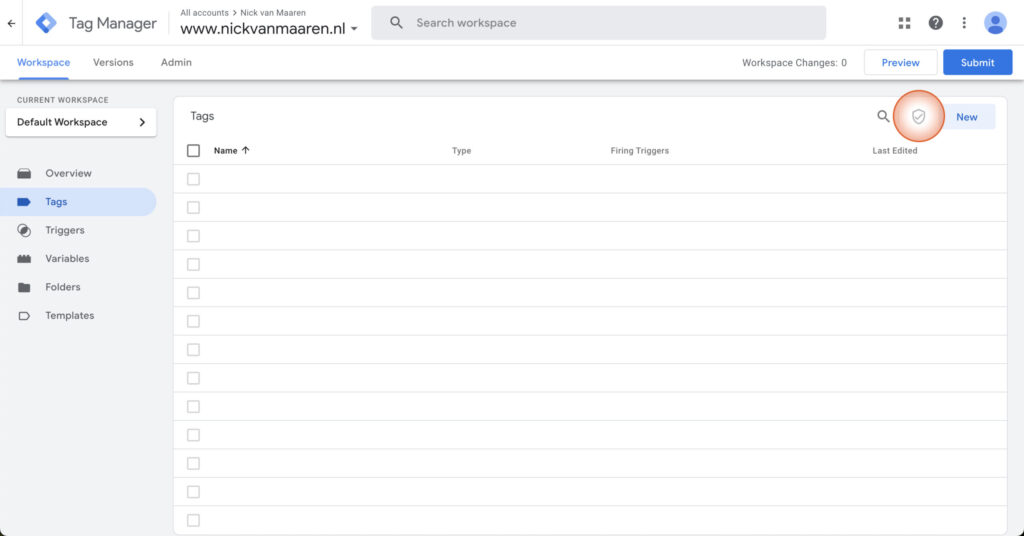
- Now go back to the ‘Tags’ menu. You will now see the ‘Shield’ icon at the top of the tag overview. With this consent overview, you can manage which consent is needed for each tag to work.
Step 2: Check if consent is properly transmitted
After publishing all changes, it’s time to check if everything is loading correctly.
Check consent mode in GTM:
You can check in GTM itself whether consent mode is set up correctly. This is done in preview mode.
- Click on ‘Preview’ at the top.
- Connect the Tag Assistant to your website.
- Enter your cookie preferences if you haven’t done so already. Then, visit a second page.
If everything is set up correctly, you should now see several new ‘Messages’ on the left side of the screen:
-
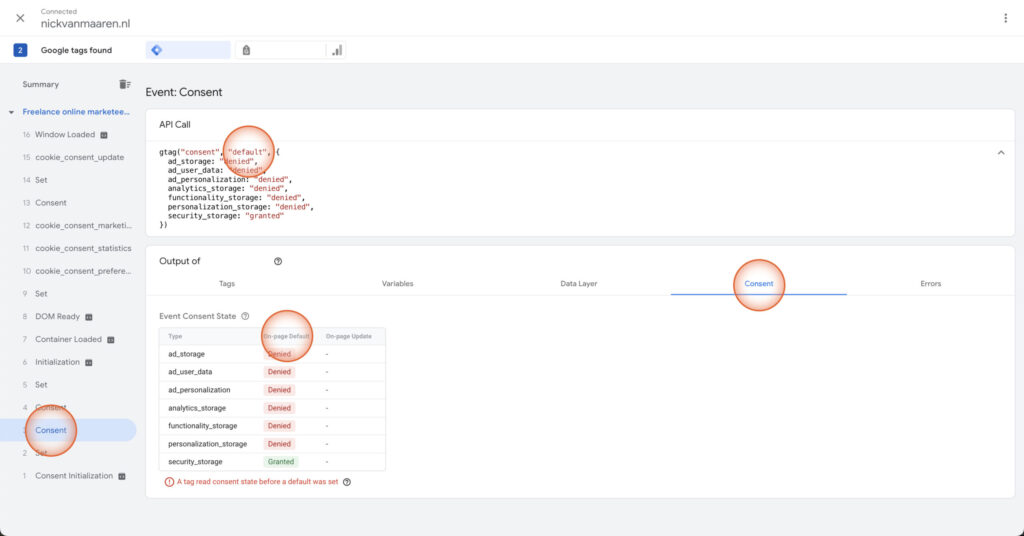
- A Consent message that loads the defaults. This should appear before (below) the Container Loaded message. See the screenshot below.
- A Consent message that communicates the update. If you’ve already specified your preferences, this appears before the Container Loaded message, and after you’ve entered your preferences, it appears afterward.
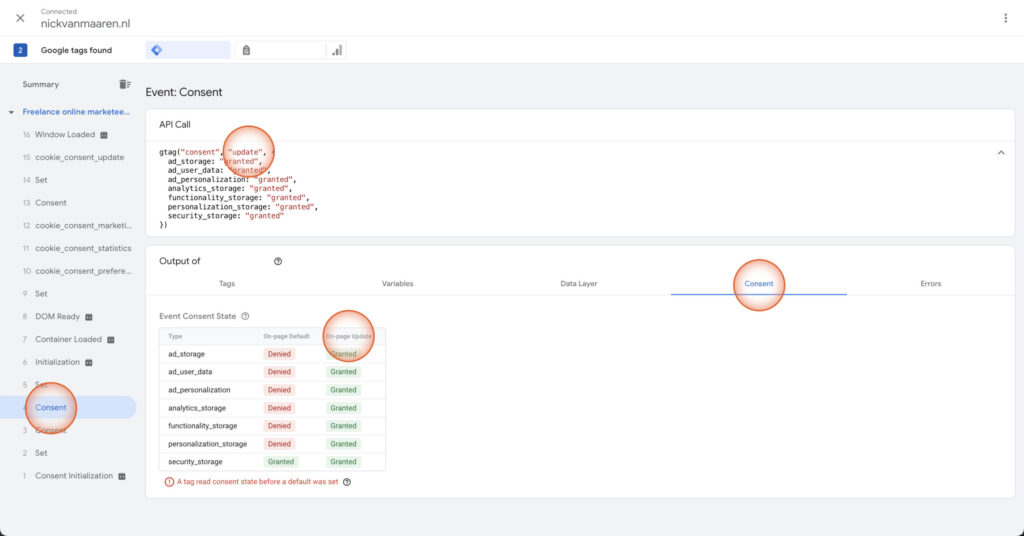
- Various Set messages (which transmit values for url_passthrough and ads_data_redaction).
- If you have implemented Cookiebot via GTM, it’s possible that you’ll see another Consent update later on the page. As far as I know, this isn’t a problem.
- Additionally, you’ll see several new events:
- cookie_consent_preferences: This event is only transmitted when someone accepts preference cookies.
- cookie_consent_statistics: This event is only transmitted when someone accepts statistics cookies.
- cookie_consent_marketing: This event is only transmitted when someone accepts marketing cookies.
- cookie_consent_update: This event is only transmitted when someone submits or updates their preferences.
- A Consent message that loads the defaults. This should appear before (below) the Container Loaded message. See the screenshot below.
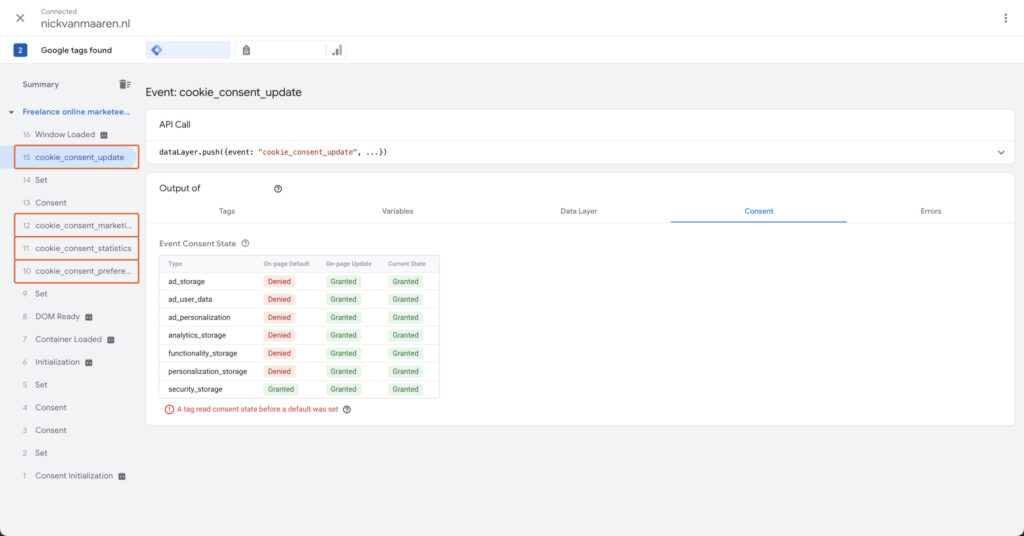
For each ‘Message’ in the menu on the left, you can see the values Google Tag Manager is receiving for each ‘consent parameter’ (ad_storage, analytics_storage, etc.). You do this by clicking on a Message and then clicking the ‘Consent’ tab, as shown in the images above. You should see a table with values for each consent parameter. For each parameter, you’ll see the default settings, and when the visitor has submitted their consent preferences, you’ll see the updated statuses.
If you see this table with the correct values, if the Consent default and Consent update messages are received at the right time, and if no Google tags are loaded before the Consent default message, then you’ve done it correctly.
You’ll also see the message ‘A tag read consent state before a default was set’ in some of the screenshots above. This happens because we load Cookiebot via Google Tag Manager, and the defaults are set afterward. However, these consent states are not needed for Cookiebot itself, so this message can be ignored. If you see that tags are being loaded before the default consent states have been set, it’s important to double-check the setup.
Check consent mode in Google Analytics 4:
Recently, you can also check in Google Analytics 4 if the necessary consent signals are being received properly. You do this by opening the data stream: Go to Admin > Data Collection and Modification > Data Streams > Click on the relevant data stream.
Under Consent Settings, you’ll find two checks:
- Consent signals for ad measurement
- Consent signals for ad personalization
Additionally, you have the option to manage which Google services can receive personal data based on the given consent. If you click on this, you’ll see the options below (see image). You can leave this set to the recommended option if you’re not sure which services need to share data.
Step 3: Apply additional consent (optional)
First, it’s important to understand how built-in consent works. These tags do not require additional consent; they automatically read the consent and adjust the behavior of the tags based on the user’s provided preferences.
For GA4 & Google Ads tags, you can mark them as ‘No additional consent required.’ Here’s how:
- Click on Tags.
- Click on the consent overview icon.
- Select all tags with built-in consent.
- Click on the icon at the top right, a shield with a gear inside.
- Click ‘No additional consent required.’
- Click ‘Save’ at the top right.
For all other tags, Google Consent Mode does not require additional consent setup. Marking them as ‘No additional consent’ as I mentioned above is not necessary for Google tags but makes things clearer.
The choices you make here will affect how GDPR-compliant you are. According to GDPR, for example, you cannot simply load a Meta Pixel or LinkedIn Insight tag. If you want to have this set up correctly, you no longer need to adjust the trigger based on the consent status, but can simply set additional consent in the consent overview. GTM will then check the status of the consent parameter you set every time the trigger is fired and determine whether the tag can be loaded based on that status. It’s like an extra filter on top of your triggers.
To determine which consent parameter to add as additional consent, it’s important to know which ones exist and what they do. The following two parameters are the most important for this:
- ad_storage: Use this parameter when a tag sends data to advertising accounts (LinkedIn, Facebook, etc.).
- analytics_storage: Use this parameter for tools that analyze traffic on your website (e.g., Hotjar, Leadinfo).
Again, for the Google Consent Mode update, it’s only important to properly forward the consent mode; Google handles everything else automatically. Therefore, it’s mainly important to check that the consent parameters are being properly transmitted (either from the code or the Cookiebot plugin).
Step 4: Adjust triggers to cookie_consent_update (optional)
Want to take it a step further and get the most out of your data? Then it’s important to also adjust the triggers for the tags where you want to use consent. When someone updates their consent preferences after Container Loaded, you want the tag to still be fired (and not completely skipped).
The cookie_consent_update event is triggered by Cookiebot when someone updates their preferences or when they have already done so and open a new page. By using this trigger, you can load certain tags on the same pageview after someone has submitted/updated their preferences.
4.1. To create this trigger, follow these steps:
- Go to ‘Triggers.’
- Click on ‘New.’
- Choose tag type
Custom event. - Give the trigger a name, for example,
cookie_consent_update. - In the event_name field, enter
cookie_consent_update. - Click ‘Save.’
4.2. Next, you need to associate the trigger with the relevant tags:
Relevant tags are those that you normally load on all pages but now only want to load depending on the given consent. For these tags, you must set up additional consent.
- Go to ‘Tags.’
- Click on a tag that you want to adjust the trigger for.
- Click on the ‘triggering’ section and remove the existing trigger.
- Then click on the same section to add a new tag.
- Select the
cookie_consent_updateevent.
4.3. Adjust tag firing to once per page
Since this trigger can fire multiple times on a page (if someone updates their preferences multiple times), it’s important to adjust the events where you use this trigger to: Once per page. You can do this in a tag under ‘Advanced settings’ > ‘Tag firing options.’
Is everything set up correctly now?
Of course, I can’t say with certainty if everything is set up correctly. In most setups, the steps covered should be sufficient, but the tricky thing with these kinds of guides is that each setup can be different, and there are certainly things I might have overlooked in this guide.
Disclaimer:
I’m sharing all of this information for free and this content is not sponsored. As an analytics nerd I’ve helped many companies to implement consent mode with different CMP’s such as Complianz, Cookiefirst, Cookiecode, Iubenda & more. However, my favorite CMP is Cookiebot by Usercentrics.
Therefore, I’ve signed up as a Cookiebot partner and I can give you a 20% lifetime discount on your subscription. I’ll have to invite you manually, so contact me if you want help and would like the discount.
If you want to support my content and don’t need the discount, when you click this affiliate link and sign up I’ll get a small affiliate fee. Thanks for reading this far, hope the content is helpful and if there’s anything I can help with: let me know!
